Wednesday, 7 December 2011

The 7th tag..

over half way through now. I am enjoying the challenge of making one a day. Today’s is better than yesterday and I am pleased with the way it turned out.


DSCF1752

Needless to say there were several things I didn’t have but I did have half a sheet of glassine left over from a workshop so made the leaves, interesting how you can heat alcohol inks on that. Looking at it the only things I didn’t substitute were the tinsel, the beads and the tag itself. Still it worked out.

Tuesday, 6 December 2011

On the 6th day…

..another tag from Tim. I am not sure if this works or not. I had to use an different embossing folder and I had to stick my charm as I cidn’t even have the right rings.


I found that the paint didn’t want to work on the metal and had to put it on really thick or it went into tiny puddles. The embossing looks almost like crackle glaze! Maybe that is the paint underneath, or the distress ink.


DSCF0011

More tags, more improvisation..

Firstly I have finished Sundays tag. There were a few things I didn’t have, crackle glaze being the main one. I do have a bottle but it has gone AWOL somewhere. I also don’t have the snowman die so I cut a reindeer and covered it in Glossy Accents then dripped some alcohol ink into it and left it to dry. It was a bit too bright so I added some Perfect Pearls which toned it down a bit. Then I didn’t have the snowflake edge die so used another one. Hey ho the technique is there.


DSCF0008


Next came Mondays tag. I had 2 goes at this, the first one was on some acetate I had and the inks just wouldn’t dry, they stayed tacky so when I tried to rub the Archival off it just smeared and was a proper mess. So I cut some packaging and did it again and that worked muchDSCF0009 better. (Reminder to self to keep some packaging tucked away.) I also don’t have the ‘backwards’ stamp so used a snowflake instead. I have to say the colours are a bit ‘in your face’ and I haven’t added the ribbon yet as it was drying. I inked it to match the tag so it will be even more pink!


I will be off to find todays tag soon. I wonder if I will have the stash to do it!

Monday, 5 December 2011

Chrissie decs

These are some of the decorations we mad at Saturday’s workshop.


DSCF1746

  A pretty hanger made from 8 diecuts, inked and folded then stuck to a chipboard shape from the same die. One thing Mr Holtz does is he never makes his shapes symmetrical so the tricky bit here was to get the right ones back to back. The alternative is to ink the edges afterwards –there was a lot of inking done!


DSCF1747

This was a lovely tag, lots of Distress inks and diecuts with a rubber stamp as well.


DSCF1748

Possibly my favourite, a glass shape that we stamped and embossed with either silver or gold and then filled with ‘snow’ I added some Bedazzles as well.


DSCF1749

A drunken tree, made from different sized rosettes, cut with the Tim Holtz die. WE had great fun getting them to stay in shape and got messy with the hot glue gun.


We also had some glass birds which we coloured with alcohol inks and added some wings, I forgot the photos! Maybe later.

Sunday, 4 December 2011

Catch up day, or not

I was at one of Jennie's workshops yesterday. We mad some gorgeous Chrissie decorations and I will get them photographed an upload them tomorrow. Now Tim's Saturday tag I made a start on today but as I have no crackle glaze (lost it somewhere!) and no snowman die I decided to use a reindeer and cover it in glossy accents. Needless to say it is taking an age to dry so I got on with today' tag and managed to improves with just the embossing folder but it is done.
I am pleased with how it came out. I will get Saturdays and Monday's done tomorrow, then I will be all up to date.

Friday, 2 December 2011

Day 2 of the 12 days of Christmas tags

Well at least I had a sheet of old music paper and a stamp for the holly and ivy. Would you believe no string though and only some green wool for the neck. Still it was fun to do and at lest I have kept up so far - only day 2 though LOL.

Thursday, 1 December 2011

12 tags of Christmas - No. 1

I am intending to do as many of Tim's tags as I can, you can see them here . I don't have the die for the word, the die for the pine cones or the leaves and twigs. So I found a nice font, cut the word on the Robo, cut some Spellbinders leaves and flowers and here is the end result.
I loved doing this one, the embossing worked well, Oh and I didn't have a white dabber (sure I have somehwere but it is not where it should be). Looking forward to tomorrows.

Monday, 24 October 2011

Fun, fun, fun…

Another Saturday at Pickleberry with another great workshop from Jennie. We filled a printers tray using 14 different techniques. We all ended up very inky but very pleased with what we did.


Here’s mine -


tray


Each compartment had a different technique. I think my favourite is the top left, it is a tiny plastic lizard. He is covered in gilding flakes then put into the box and totally covered in UTEE. I finished it off at home with the letters, cut on the Robo and then dipped in Platinum UTEE. I may add something to the letters but I have time for that. It looks OK as it is I think.


I also made one of the Advent Boxes from a kit. Almost all the bits were cut, was I grateful for that. It took me a while to just cut and emboss 2 boxes with their lids, I think I might have lost a bit of patience with 25 of them. I just have to get the numbers done. Still thinking about the best way to do that.


advent

I thought the flash flare was a problem but it shoes the dots on the red card which is used for the bases.


I have also got a few more Christmas cards don, just over half way with those. I need some nice ideas for the rest.

Sunday, 2 October 2011

On the catwalk!

I went to another workshop yesterday, run by the wonderful Jennie from The Artistic Stamper where we decorated a mannequin. What fun it was too, we inked and stamped sticky backed canvas for the bodice and then made the skirt with a birdcage die stuck on to more sticky backed canvas then we added gilding flakes – have to love those. We then cut leaves out of grunge paper, mouldable plastic, metal and shrink plastic and played with those using alcohol inks. Then it was time to assemble. It took a little longer than we had so we all took the foundations home to finish and I couldn’t wait so did mine this morning. Hope you like the end result, I am very happy with it.


mannequin

Sunday, 11 September 2011

Big catch up

It hs been so long since I blogged, I have almost forgotten how! Well not really but you know what I mean.


I have done quite a lot more than is here but I would have to split it all into 2 or 3 posts so I thought one of my favourite pieces would be best.


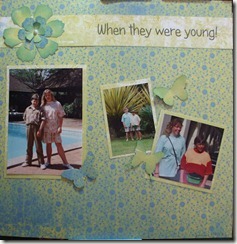
First there is a LO I did of the kids ‘When they were young’. The photos were taken when we took them to Kenya on holiday and we came across the pics while clearing out some drawers. I just had to do this
young


Next I have some photos of Connor with his pop up tent, he loved it and spent ages popping in and out


pop

The image is a bit small to show his expressions but they were so funny.


I also made a star book for Alan, he doesn’t have many photos of Connor and wanted some. Hope he likes this


star1star2

Lots of pics of him with various family members and on his own.


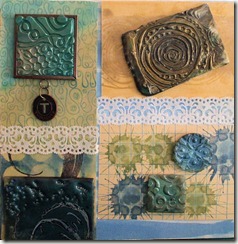
Then I did a UTEE class with the lovely Jennie and put my pieces on canvases, this is one of 3.
utee

The yesterday I did a Spellbinders workshop where we used a new template for making flowers. We made this first, you can see the fleur1

template as well. It is easy once you get the hang of it and there are some videos on You Tube that I want to check out in case there is more.


Then we cut the same template in felt and this is the result

fleur3


The one with the green leaf has another, larger leaf which is hidden and is set on a brooch pin. I added a few Stickles to match.


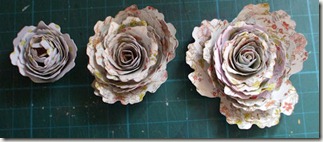
Finally I spent the afternoon playing and made these.
 

fleur2

From the left, one made starting from the centre of the template(normally you start form the outside). Makes a tighter flower. The middle one is made with 2 die cuts, the same as the ones on the trinket box. Finally I had a go at cutting 3 and assembling them, I actually like this the best and will make more once I find some suitable paper.


OK this is the end of a long post, hopefully it won’t be so long next time.


Thanks for looking.